Sanding: the necessary evil
 There’s a common misconception that if wood is clean and smooth, there’s no need to sand. This couldn’t be further from the truth; we sand NOT to make the wood smooth but, rather, to open the grain to allow the stain/finishes to penetrate and create a strong bond.
Sanding is often the most important process in finishing, however a fact that is often overlooked is the importance of sanding at each step along the way of the finishing process to ensure that color is consistent, adhesion is strong, and the final appearance is what was intended.
But the world of sanding can be a maze of questions and frustrations if you don’t know which abrasive or sanding tool is best suited for your job, or when you have sanded just enough or too much … or don’t understand why there are swirls or color variances in the finished work.
The key to completing a craftsman-quality job is learning how to choose which abrasives fit the individual need of each unique situation. A little knowledge on how they are designed and perform can help you choose the right tools for any job—and save you some frustration.
SANDPAPER AND SANDING SPONGES ARE NOT TWINS
Contrary to popular belief, these two types of abrasives sand nothing alike. Though they have the same mineral and grit on them, they deliver performance and appearance that are night and day from one another. For example, 100 grit applied to a sheet of sandpaper will give you a 100-grit scratch, however when 100 grit is applied to a sanding sponge, you will get a 220–280-grit scratch.
Another misconception is that grit should be the deciding factor in the selection of abrasives when, in fact, the grit number simply specifies the size of the mineral and how many are on a square inch of the paper/sponge.
THE NITTY-GRITTY OF SANDPAPER
There are four main components that make up sandpaper: backing, glue, mineral and type:
Backing: The backing’s firmness and flatness will affect the scratch; the stiffer the paper, the less the mineral will deflect while scratching, delivering a deeper and faster scratch. A soft backing on a sponge (a flexible backing on sandpaper) will allow the abrasive to refract more, causing lighter, smoother scratches.
Glue: Different types of glue are used based on how best they are suited for flexibility, heat resistance, wear, and if they are designed for wet-sanding. (A waterproof adhesive is used to glue the minerals to the backing for use in wet-sanding.)
Mineral: There are several different types of minerals used in abrasives, each creating a different kind of scratch, yet they are graded on the same scale. An example is 120-grit garnet vs 120-grit ceramic; though the grit is the same, these two types of minerals’ performance and scratch are on opposite ends of the spectrum. Garnet is the only natural mineral, for use on wood only, and is great for soft woods like pine, producing an excellent finish appearance.
Ceramic is manmade, more costly, very aggressive and tough. It can be used on all ferrous/non-ferrous metals, but its scratch is too aggressive for wood.
Two of the most common minerals are aluminum oxide and silicon carbide. Aluminum oxide, the most widely used, is a tough, durable, blocky-shaped synthetic mineral that wears slowly and produces an even scratch. It is most commonly used for sanding raw wood, leveling and shaping—but is not the best choice for sanding finishes. Silicon carbide is very hard and sharp, but brittle. It will produce consistent fine scratches, which is great for sanding in between finish coats and to reduce swirl marks.
Type: The final component in sandpaper is the type: open coat or closed coat. With open-coat abrasives, the minerals cover the backing only 40%–70%, allowing particles to release so as not to clog the paper. This type is best for bare (or white) wood sanding. With closed-coat abrasives, the mineral covers 90%–100% of the backing, making this type of sandpaper more appropriate on finishes, glass (polishing edges) and steel. There are also some types of sandpaper that add a stearate to keep particles from sticking to the backing.
DIGGING DEEPER FOR AN ANSWER
Unfortunately, when you’re standing in the abrasives aisle, you’ll find that much of this critical information is not printed on the packaging—or it may be in the fine print. So then how can you make an educated decision on what to buy for your specific project?
There are two ways: touch and sight. Feel the surface of the abrasive to judge if the mineral is going to be too aggressive for your use. This is where you may need to rely on past experience. Also, look at the color, which will say a lot about the makeup of the product:
- The ceramic mineral is usually purple, blue or red. If it looks and feels really bulky and coated, andthe package is promoting ‘long lasting,’ it is designed for an aggressive cut but gives the least appearance factor when staining. This type is best used for stock removal (aggressively sanding the wood to level it or remove large amounts of thickness) or for stripping.
- The garnet mineral is usually orangish brown in color and is very rough, but not coated like ceramic.
- The aluminum oxide mineral, the most popular grain used, tends to be gold or tan in color by most manufacturers. It will work in most sanding operations, but it’s not the preferred mineral to achieve the best appearance and performance when it comes to sanding between finish coats.
- The silicon carbide mineral is typically silver, gray or black. It is used on wet-dry sandpaper, and is preferred for sanding between finish/coating applications.
So now you can understand why a 120-grit abrasive made by different manufacturers who used different minerals will provide very different outcomes.
BEYOND HAND-SANDING
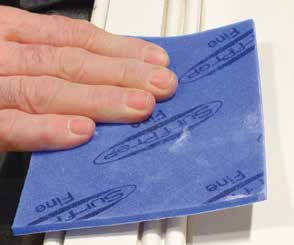
When choosing an abrasive tool, you first need to decide how much contact you wish to have your abrasive make on the surface because whether it be a hand block or power sander, the firmness of the back-up pad will affect the performance of the abrasive. Hard back-up pads are great for leveling or flattening a surface, and scratch more aggressively. For detail sanding, soft or curved areas, a softer backup pad is a better choice because the contact is more consistent, but slower scratches result. This helps to explain why sanding sponges are best for soft, curved areas. There are some key advantages to using sanding sponges, like the fact that they will wear longer and can be used for both wet and dry sanding.
The decision to choose a pneumatic (air) or electric sanding tool comes down to where you will be sanding; in the field or in a shop. Consider that the air needed to efficiently support a pneumatic sander is more than a field compressor can sustain for proper use of the tool, without blasting water and/or oil onto the surface. Also, weigh in that an electric sander can save you money on energy costs, in addition to being lightweight and portable.
Random-orbit sanders offer different orbit patterns, which will affect the performance and appearance of your sanding. The 3/16 orbital is faster and more aggressive, while the 3/32 orbital is slower and creates a finer pattern, making it more suited for finish sanding. When operating an orbital sander, it is important to let the tool do the work; don’t force it down onto the surface. Also, remember to change your abrasive when you notice it stops scratching easily, and make sure your backup pads are not damaged in any way, or you will feel thump … thump … thump. Damaged backup pads will telegraph the defect onto the surface with every spin, necessitating it then be hand-sanded out.
In building your own abrasive system—the tools you will choose from for each unique situation—you have options to add or subtract to the key components to modify a desired performance, and some sanding manufacturers have made amazing combination tools that can reduce your time spent on a job—as well as frustrations.
________________________________________________________________________________________
 Diane Shattuck has been in the woodworking industry for more than 39 years. She has owned and operated her own finishing business, written monthly blogs for FinishingIQ, been published in several trade magazines, and interviewed by HGTV Magazine for her expertise on sanding and finishing techniques. She is regularly a guest speaker for international trade events including the International Woodworking Fair, Association of Woodworking & Furnishings Suppliers, and various woodworkers and woodturner guilds. She is also a freelance consultant to both professionals and DIYers on finishing, techniques and coatings, and can be reached at DianeShattuck@msn.com